Electronic Team uses cookies to personalize your experience on our website. By continuing to use this site, you agree to our cookie policy. Click here to learn more.

Hyper-V USB Dongle Passthrough: Step-by-step Guide

Editorial Team Editorial Team Oct 24, 2022

One of the biggest drawbacks of the solutions based on Hyper-V is the poor support for USB devices.

However, virtual desktops based on Hyper-V are a pretty widespread phenomenon, so it can be extremely useful to be able to attach USB dongles to Hyper-V guest machines.

Many professional software solutions will not function properly on a machine without a USB security dongle being connected to its port. To use this type of protected software on a Hyper-V virtual machine, you need to pass the license key to Hyper-V.

This article will show you how to implement a Hyper-V USB passthrough so your local USB device can be recognized by a Hyper-V host or client.

USB passthrough is the technical term used to describe the process of enabling a virtual machine to access local resources like printers or USB dongles. This can be done with specialized software or by implementing USB dongle redirection at the Hyper-V host level.

The Problem of Hyper-V USB Device Redirection

When you are in the active window of a running virtual machine, you cannot access any local peripherals (USB or SCSI) connected to the host computer. For Hyper-V to connect to a USB peripheral, you need to redirect its traffic from the host to the guest VM. This may not be possible due to the limited number of USB ports on the virtual machine. In some cases, there may be no available ports at all.

The solution to a Hyper-V dongle redirection issue

Donglify offers users a simple method of accessing a USB dongle inside a Hyper-V session.

Donglify
Start your free trial today
7-day Trial • Cancel anytime.
4.5 Rank based on 198+ users
Read all reviews
Available on Windows 7/8/10/11, Server 2008 R2/2012/2016/2019/2022, Windows 10/11 on ARM, macOS 10.14–13.0 (Intel-based), macOS 11.0–13.0 (M1 & M2-based)
Already a Donglify user? Sign In →

Donglify is not limited to making USB license dongles available that are locally attached to the virtual machine’s host computer. The tool enables you to connect to USB dongles that are physically connected over the network to remote computers and use them on Hyper-V VMs.

Donglify can connect USB dongles and security keys to Hyper-V instances over a standard TCP/IP network. This makes it easy to implement Hyper-V USB passthrough to access the necessary security keys.

How to use a USB dongle with Hyper-V

Below you'll find detailed steps that will help you start connecting USB dongles to Hyper-V guest VMs with Donglify.

1
Create a personal Donglify account.
 create Donglify account
2
Install Donglify on the machine that is physically connected to the USB dongle. This machine is referred to as the server. The software also needs to be installed on all the client Hyper-V guest machines that will connect to a shared UDB dongle over the network.
 install Donglify
3
Start Donglify on the server and all the client machines with the same account credentials.
 Donglify login screen
4
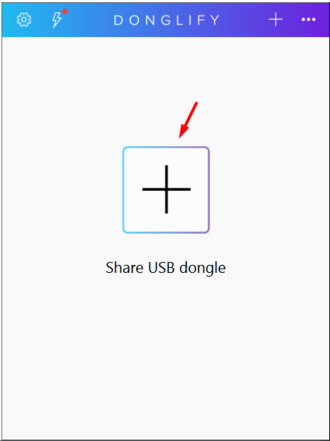
On the Hyper-V host, Click “+” to view the list of USB security keys that you can share.
 view list of available dongles
5
Select a USB dongle to share. Then check the radio button next to its name and click “Share”.
 share USB dongle to Hyper-V
6
From within a Hyper-V guest session, locate the shared USB dongle you want to access and click "Connect".
 connect shared dongle to Hyper-V

After the link is established, the USB dongle redirection to Hyper-V is complete. The client machine’s Device Manager will recognize the dongle as if it had a physical connection.

Watch the following informative video that shows you how Donglify redirects USB license dongles to Hyper-V virtual machines.

Donglify

Pros and cons of using Donglify to access a USB dongle inside Hyper-V

Pros:

Advanced security. Donglify employs 2048-bit SSL encryption to keep your dongles secure and prevent unauthorized access to network data transmission.

Multi-connect feature. There are instances when a team of programmers all need to access the same USB dongle simultaneously. This problem can be made even more complex if the individuals are using Hyper-V virtual machines. Using Donglify’s multi-connect functionality, you can share your USB dongles with Hyper-V users with a few clicks. This saves money and aids team productivity.

The following video shows how to use a Dongle with multiple machines at the same time.

Donglify

It’s a complete solution. With Donglify, you don’t need additional software or hardware to remotely share security dongles over the network.

Share access safely. Donglify lets users create digital tokens that can be used by others to access shared account. The token enables sharing account capabilities without divulging your credentials to any other individuals. A token lets a user access the account without providing an email address or password.

Provides cross-platform support. Donglify’s newest version supports Windows and Mac computers. This gives teams additional flexibility when sharing dongles over the Internet or local networks in cross-platform environments.

Cons:

An Internet connection is required. The software requires a consistent Internet connection which makes it impossible to share dongles over a LAN.

Only works with USB dongles. Donglify only works with USB dongles and does not support sharing other types of USB devices.

Alternative software solution for attaching USB dongles to Hyper-V VMs

USB Redirector software solves this issue and allows you to redirect USB dongles, PnP devices, and even a USB hub to a Hyper-V virtual machine. With this utility, you can access any network-attached USB device in your virtual machine via Ethernet. This allows you to work with USB peripherals that are not in physical proximity to your VM. Just follow this simple procedure to make this possible.

Redirect USB Dongles to Hyper-V
14-day free trial

Steps for Hyper-V USB Device Redirection

In the following video you can watch how to connect USB security dongles to Hyper-V guest machines:

USB Network Gate

For the text instructions on how to achieve Hyper-V dongle passthrough, please follow the steps below:

  1. 1
    Download USB_Network_Gate.exe from the official webpage and install the app on both physical and virtual machines.
     USB to Ethernet connector
  2. 2
    Share a USB dongle that is attached to a physical server. This can be any computer that is attached to your network.
     Remote USB devices tab
  3. 3
    After the dongle has been shared from a server it can be accessed by a virtual client machine. Use USB Network Gate on the VM to establish communication with the USB device.
     USB remote connection
  4. 4
    Your Hyper-V Device Manager will display the shared device. At this point, the virtual machine can use that device just as if it had a direct physical connection to the equipment.
     Share USB device

The pros and cons of using USB Redirector to enable Hyper-V USB Dongle support:

Pros

  • Cross-platform compatibility supports the Windows, Linux, and Mac operating systems.
  • Minimal network configuration is required.
  • Support for a wide variety of USB devices.
  • Stable USB connections.

Cons

  • Network connectivity is required to implement the redirection of local devices.
  • The software is a paid, commercial application.
Start your free trial today
7-day Trial • Cancel anytime.
Already a Donglify user? Sign In →