Electronic Team uses cookies to personalize your experience on our website. By continuing to use this site, you agree to our cookie policy. Click here to learn more.

Raspberry Pi USB Sharing Guide

Editorial Team Editorial Team Aug 3, 2020

Those who own the Raspberry Pi mini-computer have already experienced its great advantages including but not limited to small size and flexibility. Thanks to its powerful features, this device has gained popularity among millions of users worldwide.

As of now, Raspberry Pi 3 is probably the most commonly used model of the board. However, a new model Raspberry Pi 4 stands a good chance to become even more popular soon.

One of the useful things that all Raspberry Pi micro-computers have is a USB port to which you can connect any USB device.

In this brief tutorial, we’re going to tell you how to use a Raspberry Pi for USB drive sharing and which additional tool can significantly simplify this task.

Software solution to share Raspberry Pi’s USB port over network

If you have a Raspberry Pi with a USB hard drive or USB dongle connected to it, you can easily share the attached device across the network with the help of a dedicated third-party solution called USB Network Gate.

USB Network Gate is a professional software app designed for remote access to USB ports and devices. This solution is based on advanced USB port virtualization technology that allows redirecting USB devices to the remote side over LAN, Ethernet, or the Internet.

Try for Free USB Network Gate NOW
14-day free trial

Thanks to the USB port sharing functionality provided by USB Network Gate, you can remotely connect to a USB device plugged into a Raspberry Pi and access the device from your computer like it was physically attached to your machine.

How to share a USB drive on Raspberry Pi


Now let’s see how to share a CODEMETER USB dongle over IP on Raspberry Pi:

Raspberry Pi USB dongle
  1. Download USB Network Gate and install it on your computer. The software is available for Windows, macOS, and Linux operating systems, select the one depending on your OS.

  2. Download Linux Debian ARMv7 and install it on your Raspberry Pi.

  3. Get the list of devices attached to the Raspberry Pi board. USB Network Gate to install on Debian

  4. Select the required USB dongle from the device list and share it with the help of the USB Network Gate app. The computer on which you share the device is referred to as a Raspberry Pi USB server.

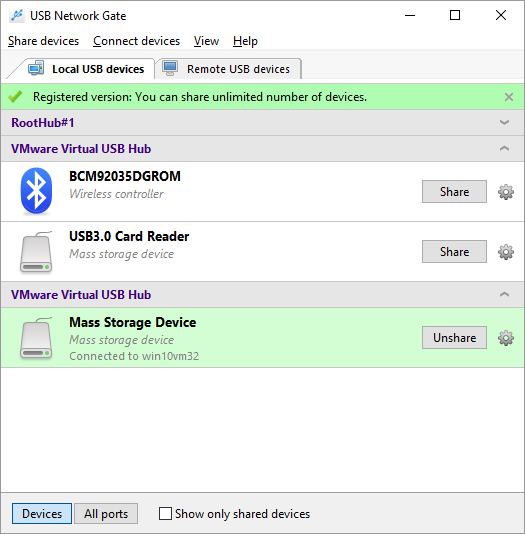
    To share the dongle, you should start USB Network Gate and open the Local Devices tab. Find the dongle in the list of USB devices attached to your Raspberry Pi and click the Share button next to its name.

    Raspberry Pi USB server

    This way you share a USB dongle over the network using Raspberry Pi and the USB Network Gate software.

  5. Establish a client connection. To do this, install and start USB Network Gate on the client machine, open the Remote Devices tab, find the dongle in the list of available devices, and click the Connect button:

Note: If the server and client computers are in the same subnetwork, there’s no need to specify the server’s IP address in order to connect to the shared device.

USB network Gate client connection

This is it! The Raspberry Pi USB dongle over network connection is created!

Now, the USB dongle that is physically attached to your Raspberry Pi is connected to the remote client computer as though it were inserted directly into that machine.

USB dongle is connected to the remote clien
logo USB Network Gate
#1 at Networking
USB Network Gate
Share USB over Ethernet on Windows
4.7 rank based on 372 + users