Electronic Team uses cookies to personalize your experience on our website. By continuing to use this site, you agree to our cookie policy. Click here to learn more.

Sharing USB over Ethernet With Raspberry Pi made easy

Being able to share a USB device across the network can be very beneficial in lots of day-to-day situations. Say, you have a license dongle for the software everyone in your office needs to use. And every single day that dongle gets plugged in and pulled out more times than anyone can count and chances are good that at some point it will just fall into pieces. Sure, things can’t go on like this forever, but purchasing everyone their own license is way out of your budget. There must be another way around this, right?
14-day Free Trial available
License price starts at $159.95
Available for
USB over Ethernet Raspberry Pi

Well, as you may have heard, you can share a device connected to USB over TCP/IP with a Raspberry Pi. To do that, you’ll get some special-purpose software. And the main question here is: which one should you get? A surefire paid app or a free, but glitchy open-source solution? Let’s take a look at both.

The most obvious method of sharing a USB from Raspberry Pi

The first thing you need to do to set up your Raspberry Pi as a USB-over-Ethernet server is to make sure the Raspberry is running on Ubuntu 14.04-19.10 and is connected to the device you’re about to share. Then, follow these steps:
1
Download the correct USB Network Gate version for your OS.
2
On the Raspberry, execute these commands:
dpkg -i [package]
apt-get install -f
rpm -i [package]


Or, you can use this one: yum install [package]
3
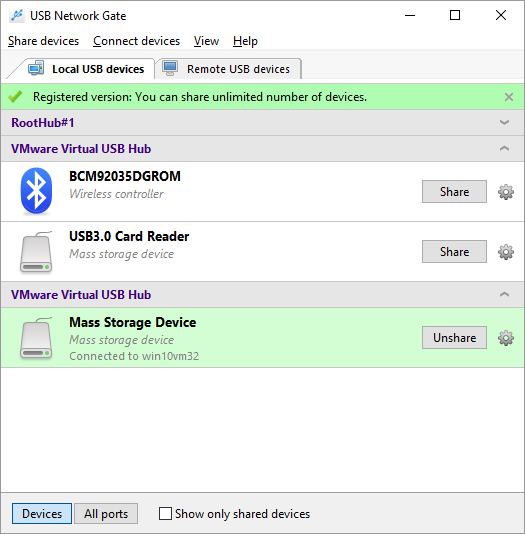
Start the app and click “Share” next to your device.

That’s it!

After that, you’ll be able to access the shared device from any machine connected to the Internet, no matter the OS on that remote machine (works for Linux, Windows, and Mac), or the physical distance to it. You won’t even need to load the kernel module to launch USB Network Gate on a Linux machine. Plus, the app can be used on VMware, VMware ESX Server, Citrix XenServer, and Microsoft Hyper-V virtual machines. This method works for USB devices of all types and brands. All the device sharing/unsharing takes effect immediately with no system reboot required.

All the connections established with USB Network Gate are totally secure thanks to the advanced 2048-bit SSL encryption. Plus, you can set an authorization password for extra protection. So there’s absolutely no chance any of your data will get into the wrong hands.

Sharing USB over Ethernet
14-day free trial

The best thing about opting for USB Network Gate is that you don’t really need to permanently turn your Raspberry Pi into a USB-over-IP server. It’s a multi-platform solution great for sharing USB devices from any machine you have, plus, there is no limit as to the number of shared devices.

Sharing a USB from Raspberry Pi with a freeware app

This method is, at its core, the same way of sharing USB over IP in Ubuntu, only this time we’re going to use a different app. Keep in mind that it’s open-source Linux-based software that is still under development. Make sure you're ready for a technically challenging set-up process and don’t get down if you’ll boggle the first attempt.

Other important points to take note of before we start:

  • This method won’t work outside of your local network.
  • Only works for sharing devices from Linux PCs.
  • The smaller the distance to shared devices — the better connectivity.
  • Information vulnerability to unauthorized access.
  • No traffic optimization whatsoever.

First off, let’s set up your Raspberry Pi as a server:

1
Using this command to install the app:
sudo apt install usbip
2
Add the kernel module we’ll need:
sudo modprobe usbip_host
echo 'usbip_host' >> /etc/modules
3
Now, use the following command to see the list of all USB devices attached to your Raspberry Pi:
lsusb
4
Write down the USB ID number of a device you’re going to share.
5
Use this command to find out your device’s bus ID (look for the USB ID number from the previous step and you’ll find the right device):
usbip list -p -l
6
Run the command(N is the bus ID number from the previous step):
sudo usbip bind --busid=N
7
execute this command to run the demon and attach the device to the USB/IP:
usbipd

Or create a systemd service:
vi /lib/systemd/system/usbipd.service

with the definition (replace N with the actual USB ID number of your device):

[Unit]
Description=usbip host daemon
After=network.target

[Service] Type=forking ExecStart=/usr/sbin/usbipd -D ExecStartPost=/bin/sh -c "/usr/sbin/usbip bind --$(/usr/sbin/usbip list -p -l | grep '#usbid=N#' | cut '-d#' -f1)" ExecStop=/bin/sh -c "/usr/sbin/usbip unbind --$(/usr/sbin/usbip list -p -l | grep '#usbid=N#' | cut '-d#' -f1); killall usbipd"
[Install] WantedBy=multi-user.target
8
Run these commands to start that service, if you’ve opted to create one:
sudo systemctl --system daemon-reload
sudo systemctl enable usbipd.service
sudo systemctl start usbipd.service

And here is a set-up guide for a client:

Note: The app’s client version for Windows is a beta with no support for Windows 10. so we won’t consider it here.

1
On your client PC, install the app with these commands:
sudo -s
apt-get install linux-tools-generic -y
2
Enable the kernel module:
modprobe vhci-hcd
echo 'vhci-hcd' >> /etc/modules
3
Use this command to connect the shared device (replace 0.0.0.0 with the actual IP of your Raspberry Pi):
sudo usbip attach -r 0.0.0.0

Or create a systemd service:
vi /lib/systemd/system/usbip.service

defined as:


[Unit]
Description=usbip client
After=network.target

[Service] Type=oneshot RemainAfterExit=yes ExecStart=/bin/sh -c "/usr/lib/linux-tools/$(uname -r)/usbip attach -r 0.0.0.0 -b $(/usr/lib/linux-tools/$(uname -r)/usbip list -r 0.0.0.0 | grep 'N' | cut -d: -f1)" ExecStop=/bin/sh -c "/usr/lib/linux-tools/$(uname -r)/usbip detach --port=$(/usr/lib/linux-tools/$(uname -r)/usbip port | grep '<Port in Use>' | sed -E 's/^Port ([0-9][0-9]).*/\1/')"
[Install] WantedBy=multi-user.target

Don’t forget to replace N with an actual USB ID number of your device and 0.0.0.0 with your Raspberry’s IP address.

Save the service and execute these commands to start it:

sudo systemctl --system daemon-reload
sudo systemctl enable usbip.service
sudo systemctl start usbip.service


If you still can’t access the shared device from the client machine, start again from step 1 of the server set-up guide.

Important! DO NOT unplug USB devices from the Raspberry Pi while it’s shared by this method. Turn off your Raspberry first to prevent data loss and/or save device from being damaged.

Try USB Network Gate now
14-day free trial

A table for comparison between the two methods:

Distance limitation
Distance limitation
None
 
LAN coverage area.
 
Supported platforms:
 
 
Server-side
Server-side
✓ Windows
✓ Linux
✓ macOS
✓ Android
 
✓ Linux
 
Client-side
Client-side
✓ Windows
✓ Linux
✓ macOS
 
✓ Windows (beta)
✓ Linux
 
Traffic optimization
Optional encryption
 
N/A
 
Security
Security
Password
 
N/A
 
Encryption
Encryption
2048-bit SSL
 
N/A
 
Wireless connectivity
Yes
 
N/A
 
Activity log
Activity log
Yes
 
N/A
 

Closing remarks

Whatever method you will go for, please keep in mind that a free option isn’t always the best one. and what seems to be saving at the start can turn out to be a loss later down the road. Nine times out of ten it’s much more rewarding to invest in a tried and tested app that’ll be easy to use and won’t cause any trouble than put your whole operation at stake and batten down the hatches waiting for your free tool’s next failure.

USB Network Gate

Redirect USB devices over network
14-day Free Trial available
License price starts at $159.95
Available for