Cookie
Electronic Team uses cookies to personalize your experience on our website. By continuing to use this site, you agree to our cookie policy. Click here to learn more.

Connect External Hard Drive To Remote Desktop [Detailed Tutorial]

Olga Weis Olga Weis Aug 3, 2021

The Coronavirus pandemic changed the way we work forever. While work-from-home was initially intended to be a temporary arrangement to limit the spread of COVID-19, more and more workers are opting to stay partially or fully remote from now on.

For those with teams who operate remotely, Remote Desktop Connection quickly established itself as an essential and indispensable tool for redirecting USB devices to remote desktop.

Today’s article is one from a series that focuses on helping users answer the question: “how to set up the remote desktop connection on my computer to an external hard drive”, and more...

If you’re interested in learning more about working with different devices via remote desktop (like how to access external drive from remote desktop connection, for example), keep reading.

Connect external hard drive to remote desktop - software solution

USB Network Gate makes it incredibly easy to use an external hard drive on the remote desktop. The software solution redirects the external hard drive to the remote desktop by virtualizing physical USB devices and making them usable through a computer’s USB port during RDP.

USB Network Gate gives users a reliable way to copy and transfer data by redirecting virtual copies of hard drives to the RDP session.
UNG logo

USB Network Gate

4.9 Rank based on 179+ users, Reviews(72)
Download 14-day trial, You can share only 1 local USB-device
 external drive on remote desktop

This software tool even lets users configure their active remote desktop session to access locally connected external drives on the remote desktop, providing the same level of control as one would experience if the device was directly plugged into the client computer in use.

How to connect external hard drive to remote desktop

Follow the guide below to set up and utilize an external hard drive with a remote desktop:
1
On the server computer (the machine physically connected with the hard drive) download and install the USB Network Gate application.
 download usb network gate
2
On the client computer (the machine accessing the device remotely), download and install USB Network Gate, as well.
3
Run USB Network Gate on both client and server machines.
 external hard drive in usb network gate
4
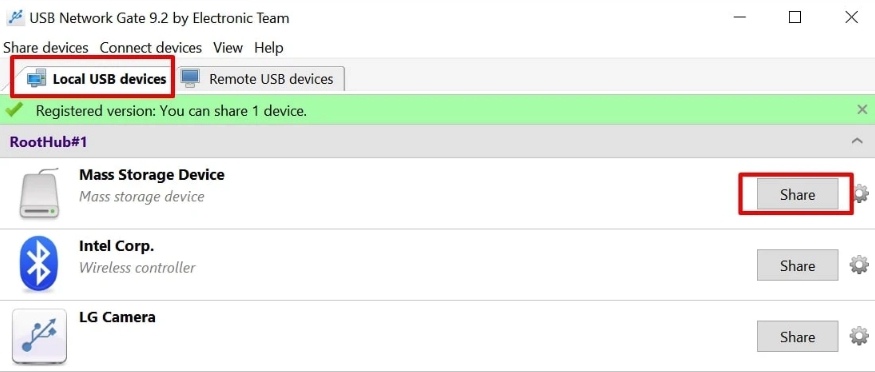
While on the server computer, select the specific USB hard drive from the “Local USB Devices” tab within USB Network Gate.
5
Then, select the “Share” option.
 connect external hard drive to remote desktop
6
From the client computer (the machine accessing the hard drive remotely), go to the “Remote Devices” tab within USB Network Gate.
7
Find the desired USB hard drive and click “Connect”.
 access external hard drive from remote desktop
8
After a connection is established, the external hard drive is recognized by the client machine’s Device Manager.

The benefits of USB Network Gate for connecting external hard drives on remote desktop

✅ On-the-go hard drive reconnection

Usually, after unplugging and reattaching a hard drive to a computer, users must restart their remote desktop session to access the device again. However, USB Network Gate negates the need for users to restart their remote desktop sessions each time a hard drive is reconnected. The device automatically appears (and is available to connect with) in the RDP session.

✅ Reverse connections

USB Network Gate makes it possible to easily access hard drives that are plugged into computers to which the user connects via RDP.

✅ Advanced safety and security

USB Network Gate utilizes advanced security encryption protocols that prevent your transmitted data from being accessed by unauthorized users. Password protection is also available, meaning that only users with the password can access specific external drives via remote desktop.

✅ Cross-platform hard drive redirection

USB Network Gate is compatible with Windows, Linux, and Mac operating systems allowing users to easily share devices between different platforms. Regardless of whether they share the same operating system or not, any computer can be configured as a “server” or “client” machine.

Easily connect hard drives to remote desktop
14-day free trial

Access local drives with remote desktop

It’s possible to have access to local disk drives on a remote computer during RDP sessions. Users can redirect their local disk drives (hard disk drives, CD-ROM disk drives, mapped network disk drives, etc...), allowing them to transfer files between a local host machine and a client computer. All of this is much the same as copying files via a network share.

Microsoft Windows Explorer allows users to see the files and disk drives on each redirected disk drive. Users can also view redirected disk drive files in My Computer. Drives will be displayed as follows: "drive_letter on terminal_server_client_name" in Windows Explorer and My Computer.

Use Remote Desktop to copy files from the local hard drive by opening Remote Desktop Connection:> Click “Show Options”> Choose “Local Resources” tab > Click “More”.

Then choose the drive(s) needed for the remote session.

hard drive in remote desktop connection
logo USB Network Gate
#1 at Networking
USB Network Gate
Share USB over Ethernet on Windows
4.7 rank based on 72 + users
Get a download link for your desktop
Submit your email address to get a link for quick download on your desktop and get started!
or