Electronic Team uses cookies to personalize your experience on our website. By continuing to use this site, you agree to our cookie policy. Click here to learn more.

How to view security cameras remotely over the Internet

Editorial Team Editorial Team May 19, 2021
Best remote access security camera guide

Remote access to security cameras can be important for a variety of reasons. With remote access to a camera, users can keep an eye on small children from a different part of the house so they can act quickly if a problem occurs. Security camera remote access lets business owners watch their shop from the comfort of their home over a computer or mobile device at any time of the day or night.

Webcams are usually connected to your computer via USB ports and remote access can be gained with USB over Internet functionality.

In this article, we will talk about how to access security cameras remotely using this efficient software solution. With this effective app, you can access your security camera from any Internet-connected device so you can always see what’s happening in your home or business.

Try the Best app to Access USB Cameras
14-day free trial

How to remotely view security cameras using the Internet

If you want to achieve remote access to a security camera you need to use a third-party software solution that can forward USB signals over an IP network. Once the USB over Internet software is implemented, you can use the network to view the feed from webcams on your network-attached computer no matter where you are located. With this reliable USB over Internet solution, you can redirect traffic from USB printers, scanners, dongles, or any other type of device. The devices can be shared over a business LAN making them available to network-attached computers with USB over Internet functionality.

How to access security cameras remotely using USB Network Gate

1
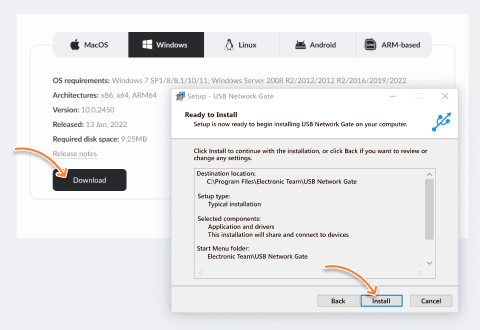
You physically connect your camera to a local computer (we’ll call it the server) and install the app on both the server machine and the PC (the client) from which you are going to access the camera remotely.
2
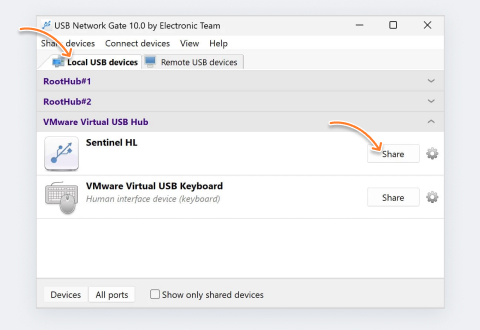
Launch USB over Internet app on the server computer and open the Local USB Devices tab. Find the camera in the device list and click “Share next” to it.
3
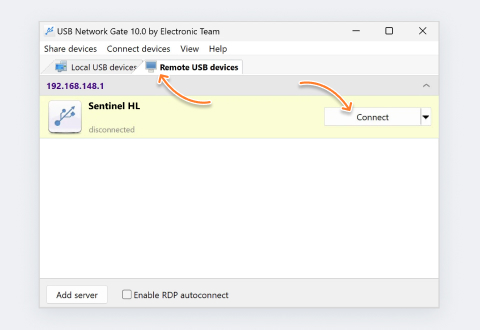
On the client computer, you start the software and go to the tab named Remote USB devices. Locate the security camera there and click “Connect” next to the device name.

Video guide:

remote access to security camera

Let’s take a look at the top benefits of this USB over Internet solution:

Cross-platform connectivity - USB Network Gate supports cross-platform connectivity. This lets you connect your camera to any supported platform and share security camera remote access with users running a different supported OS. The USB over Internet tool runs on Windows, macOS, Linux, and Android systems.

Multiple connectivity options - Access security cameras remotely using any IP-based network. Use the Internet or a LAN to share USB devices. USB over Internet also supports redirecting traffic over RDP or using the Citrix communication protocol.

Secure connectivity - USB Network Gate supports device isolation where designated users can be granted rights to access shared USB devices. This lets you control who accesses your remotely attached devices. Learn how to isolate USB devices with these guides for use with the Window OS or Remote Desktop session.

Access security cameras remotely!
14-day free trial

Configuring remote video surveillance

When it comes to remote video surveillance, the first thing that comes to mind is real-time video monitoring from anywhere globally. It seems pretty convenient to be able to access an IP surveillance camera from any networked device like a smartphone, laptop or computer. Below we describe the next method to get remote access to a security camera system. This time you will need to know your camera's IP address.

By default, security cameras with remote access capabilities are fully compatible with a vast variety of web browsing apps. However, it should be mentioned that the list of supported devices may vary from browser to browser.

How to access security cameras via IP address

Now we’ll consider how to remotely view security cameras using the Internet. But before you begin, make sure your IP security camera is installed and connected to your router.

When everything is ready, follow these simple steps:
1
Find out the IP address of your security camera:

  • Launch your router’s configuration software and find the list of DHCP clients connected to the device. Usually, it is named the DHCP Clients Table or Attached Devices. If it’s not clear which of the IP’s is the required one, you can check your camera's hardware (MAC) address.
2
Copy the camera’s IP address to the address bar of your browser and enter your login credentials.
3
Find out which HTTP port your camera is using.

  • As port 80 (set by default) may be blocked by the ISP, you may need to change it. To do this, select Settings > Basic > Network and open the Information tab. Make the required changes, click OK and save them by rebooting the camera.
4
Adjust port forwarding settings on the router. Note that depending on which router model you use, the configuration procedure may differ. In our example, you will see how to configure port forwarding on a TP-Link TL-WR941ND router.

  • Open your router’s management page.
  • Select Forwarding > Virtual servers from the left sidebar menu.
  • Click Add New and enter the IP address of your security camera and the port it uses.
  • Select All in the Protocol field and click Save.
5
Open the Status page to find the router’s WAN IP address.
6
On a remote computer that does not share the same network with your camera, you can now get access to the camera. To do this:

  • open any Internet browser, enter http://(IP address of the router):(Camera port number) and press Enter.
7
Once done, you’ll be able to view your security camera over the Internet.
logo USB Network Gate
#1 at Networking
USB Network Gate
Share USB over Ethernet on Windows
4.7 rank based on 372 + users