Electronic Team uses cookies to personalize your experience on our website. By continuing to use this site, you agree to our cookie policy. Click here to learn more.

Access Local Drive From Remote Desktop on Windows 10/11

Editorial Team Editorial Team Aug 8, 2023
local drive in remote desktop

Utilizing the Windows Remote Desktop Connection (RDC) feature allows a user to have full control over a remote Windows desktop. This article will show those seeking to configure a remote desktop manager to map local drives, exactly how to access local drives from remote desktop on Windows 10.

While sharing resources from a local computer to a remote machine poses a challenge, RDC will help users share USB over RDP and connect external hard drives to the remote desktop sessions.

But first, you will need to configure remote desktop to access local drives.

Access hard drives without configuring RDC
14-day free trial

How to set up Remote Desktop to mount local drives

Learning how to map drives from server to remote desktop doesn’t have to be a hassle. Remote Desktop Connection can make it quite a simple process. RDC is a tool that creates remote desktop sessions to Windows servers and PCs by employing Microsoft’s Remote Desktop Protocol (RDP).

All editions of Windows 10, and Windows Server include RDC by default. Keep reading to find out how to let PCs running Windows 10 show local drive in remote desktop sessions.

Microsoft not only provides RDP-functioning software that connects to Windows from a Mac, but it also works for mobile platforms like iOS and Android, too. Alternatively, Mac users can share Mac files/folders to a Windows desktop simply by using the Remote Desktop app’s Redirection tab.

For Windows users, Remote Desktop Connection is built-in by default and permits the configuration of file and folder sharing before a connection being established.
How to configure remote desktop manager to map local drive

1
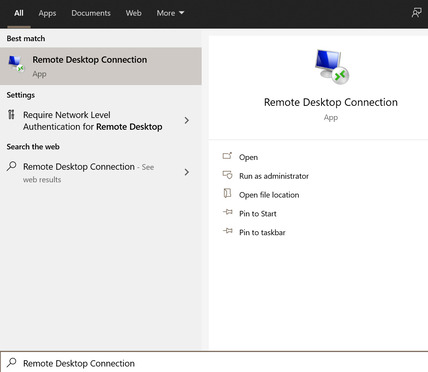
Open the Remote Desktop Connection tool. Locate this either in the Windows Start menu or by pressing the “W”+”R” keys and typing “mstsc” in the dialog box.

Note: The initial launch of Remote Desktop Connection will seem quite simple. Most often, users would enter the IP address of the remote computer and click the connect button. However, in this instance, before being able to access local files and folders, some extra configuration is required before connecting.

 open remote desktop connections manager
2
Click “Show Options” from the Remote Desktop Connection window (this displays RDC’s configuration options).
 rdc show options
3
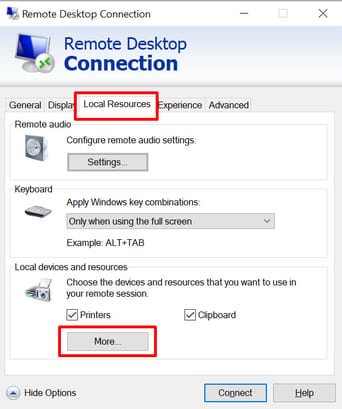
Access remote desktop sharing settings by clicking the Local Resources tab.
4
Under the Local Devices and Resources section, click “More” (users can configure RDC to share specific devices with a remote PC from the Local Devices and Resources box).
 remote desktop local resources
5
Click the “+” arrow beside “Drives”, thus expanding the section and allowing the user to share the desired local files and folders.

Note: Users can share any available Windows drives while inside the Drives section. For example, any attached optical drives (like CD drives, DVD drives, or portable storage devices - like flash drives) can be shared if the user thinks they’ll need to connect to it in the future.

6
To share storage with a remote machine, click any of the desired checkboxes and hit “OK”.
 remote desktop access local drive
7
Return to the General tab once all drive sharing settings are configured.
8
In the General tab, enter the server or remote PC’s IP address in the Computer field (located beneath the “log on Settings” section).
9
Hit “Connect” to initiate and establish a connection.
 connect to remote desktop
10
Open Windows File Explorer upon a successful connection to a remote desktop session.

Note: To open Windows File Explorer, simply right-click the Start menu and click "File Explorer".

Once inside the File Explorer, users will see all shared devices listed beneath the Redirect Drives and Folders section.

USB in RDP session passthrough
14-day free trial

How to map local drive in remote desktop?

Transferring files in a remote desktop session is a relatively easy process. Simply locate the files you want to transfer and click the Home tab at the top of the window. Click the Move to button and then the Choose Location option in the displayed drop-down menu.

You may need to map a local drive in your RDP session to enable efficient file transfers. Use the following procedure to mount a local drive in RDP so it can be used to transfer files.

mount a local drive in RDP

In your RDP session, launch PowerShell. Run the net use command to display the redirected drives.

PowerShell

Next, run the net use \tsclient command to map the local drives in remote desktop to a network drive letter.

map the local drives

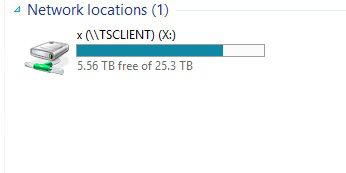
Verify the drive mapping by opening Windows Explorer and looking at the Network Locations section. You will see the network drive mappings available. When you copy files to the remote computer’s mapped drive, they will also be found on the same letter drive on the local machine.

Verify the drive mapping
logo USB Network Gate
#1 at Networking
USB Network Gate
Share USB over Ethernet on Windows
4.7 rank based on 372 + users