How to Enable and Use Microphone in RDP Session: Comprehensive Guide
Remote Desktop Protocol (RDP) is an important tool for accessing remote systems, but using a microphone during an RDP session can sometimes be difficult. Problems like audio redirection issues and setting up the right configuration can complicate the process.
This guide simplifies all you need to know about the best practices for enabling microphone in RDP sessions. You’ll understand its built-in methods, useful tips, and third-party tools, all with an easy-to-follow set of instructions for your different needs. By the end of this guide, you'll know how to easily redirect and use the microphone in a remote desktop, making your remote work smoother and more productive.
Native Methods for Microphone Redirection in RDP
Regarding how to enable microphone redirection in RDP sessions, built-in Windows options are usually the easiest and most reliable options. These methods don’t require extra software, making them perfect for users who want a simple and seamless setup.
Before setting up your RDP microphone redirection, keep these points in mind:
- Hardware and Drivers: Ensure your microphone drivers are installed and working properly. Some USB microphones might require additional software.
- RDP Compatibility: Ensure your RDP version supports audio redirection, as older versions may not have this feature.
- Network Setup: Confirm your network allows RDP audio redirection and ensure no firewalls or restrictions are blocking it.
- Security: Use encrypted RDP sessions to keep your audio data safe from potential security threats.
Overall, closely monitoring these factors will help ensure a smoother and more secure remote desktop microphone setup process.
1. Configuring RDP Client Settings
This method lets you adjust settings directly in the RDP client (mstsc). It’s a simple, quick solution that doesn’t require administrative access, making it ideal for most users.
Pre-Tips:
- Ensure both the local and remote systems support audio redirection. Older RDP clients or restricted server settings may not allow it.
- Check that the microphone drivers are installed and working properly on your local system.
- Watch out for network restrictions, like blocked ports, that could prevent audio redirection from working.
Step-by-Step Instructions:
- Open the Remote Desktop Connection client (mstsc).
- Click "Show Options" at the bottom of the interface.
- Go to the "Local Resources" tab.
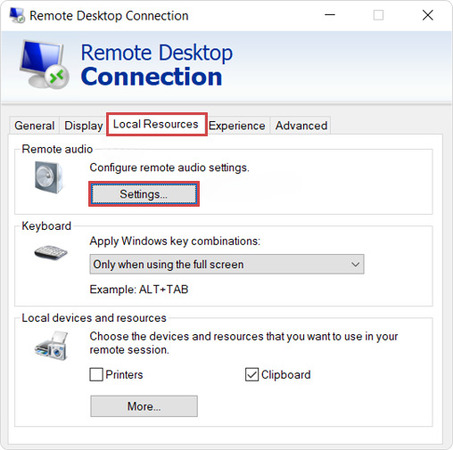
- Under "Remote audio," click on "Settings."
- Enable "Record from this computer."
- Set "Remote audio playback" to "Play on this computer."
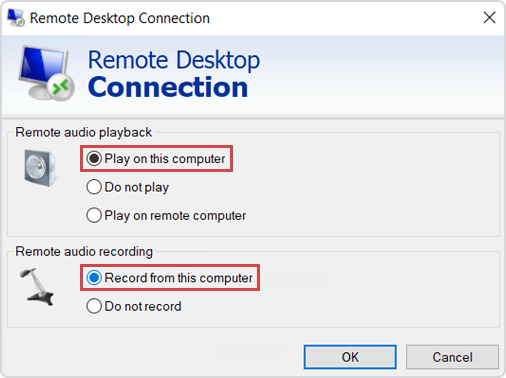
- Click "OK" to save your settings.
- Connect to the remote desktop and check if the microphone is working.
Pros:
- Easy to configure
- Requires no administrative access or system changes
- Works for most basic use cases
Cons:
- Limited to basic RDP configurations
- May not work for advanced setups or custom hardware
2. Group Policy Configuration
This method is great for IT administrators or users managing several systems. It involves using Group Policy to enable audio.
Pre-Tips:
- Ensure you have administrative privileges to access and modify Group Policy settings.
- Check for domain-level Group Policy overrides, as they might override local changes.
- Restart the Remote Desktop Services after making changes to apply the new settings.
Step-by-Step Instructions:
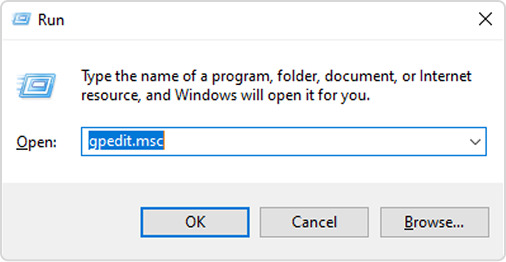
- Open the Local Group Policy Editor by typing gpedit.msc in the Start Menu search bar.
- Navigate to Computer Configuration > Administrative Templates > Windows Components > Remote Desktop Services > Remote Desktop Session Host > Device and Resource Redirection.
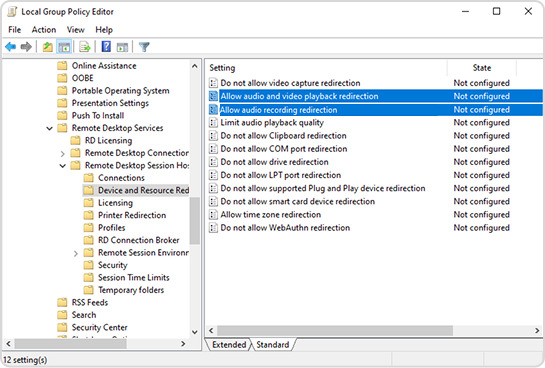
- Enable the following policies:
a. "Allow audio and video playback redirection."
b. "Allow audio recording redirection."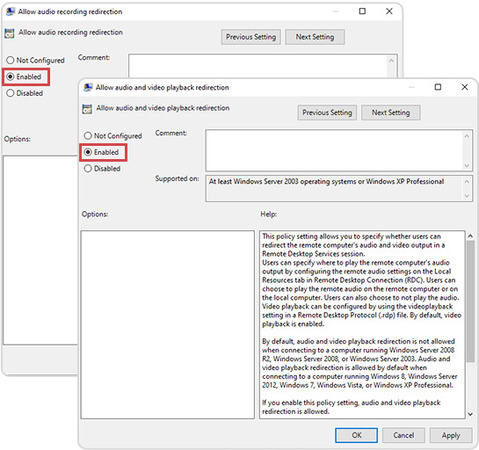
- Close the Group Policy Editor and restart the Remote Desktop Services to apply the changes.
Pros:
- It’s Ideal for large-scale deployments or advanced configurations
- It also provides detailed control over RDP settings
Cons:
- It requires administrative privileges to make changes
- Changes might not take effect until after a system restart
3. Registry Tweaks
Registry tweaks offer a powerful way to customize system settings. This method is best suited for advanced users who are comfortable editing the Windows Registry.
Pre-Tips:
- Back up your Registry before making any changes to avoid accidental misconfigurations.
- Ensure no conflicting Group Policy or session host restrictions block your RDP microphone redirection, as Registry tweaks alone may not resolve the issue.
- Editing the Registry requires advanced technical knowledge. If you're unsure, it's best to seek assistance to avoid causing system instability.
Step-by-Step Instructions:
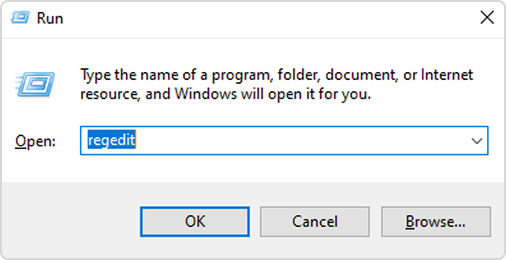
- Press Win + R, type regedit, and press Enter to open the Registry Editor.
- Navigate to: HKEY_LOCAL_MACHINE > SYSTEM > CurrentControlSet > Control > Terminal Server > WinStations > RDP-Tcp
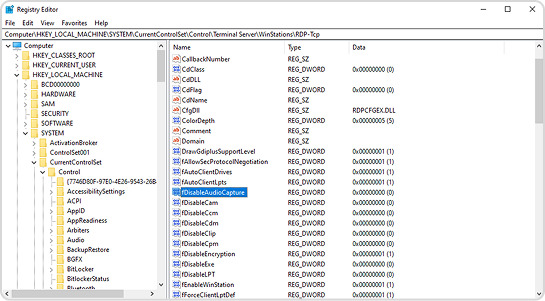
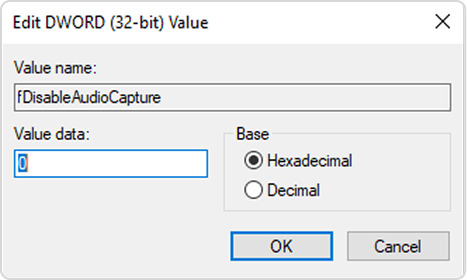
- Locate or create the key fDisableAudioCapture and set its value to 0 (this enables audio capture redirection).
- Restart the system to apply changes.
Pros:
- It provides fine-tuned control over your RDP behavior
- It’s also ideal for custom setups and advanced configurations
Cons:
- There could be a risk of misconfiguration if not done correctly
- It requires advanced technical knowledge to implement safely
4. Adjusting Sound Settings on Local and Remote Systems
Configuring sound settings on local and remote systems helps redirect audio devices in RDP, be it input or output. This method is great for troubleshooting and also for users dealing with occasional audio issues.
Pre-Tips:
- Use the “Listen to this device” option on the local system only for testing to avoid potential audio feedback loops.
- Ensure the microphone is selected as the default recording device on the remote system after redirection.
- If sound redirection doesn’t work, verify that the RDP audio settings in the client are correctly configured under the "Local Resources" tab.
Step-by-Step Instructions:
- On the local system, open the Sound settings.
- Go to the Recording tab, select your microphone, and click "Properties."
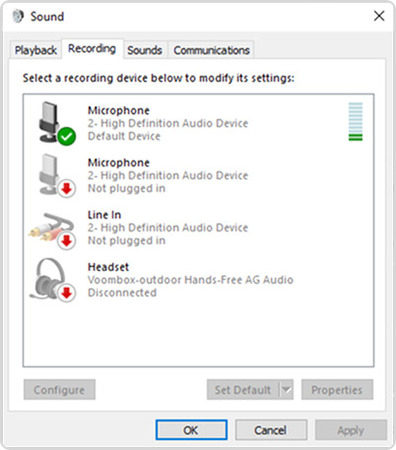
- Enable the "Listen to this device" option to test your microphone redirection.
- On the remote system, check that the microphone is listed under input devices in the Sound settings.
- Select the redirected microphone as the default recording device.
Pros:
- It’s great for troubleshooting microphone issues
- It also offers a simple verification step to ensure proper redirection
Cons:
- It involves extra steps for verification
- It may not fix deeper system-level issues
5. Using RDP Enhanced Protocols
Enhanced RDP protocols, like RemoteFX, improve audio device redirection. This method is ideal for systems running legacy Windows Servers or specialized environments.
Pre-Tips:
- RemoteFX is deprecated in Windows Server 2019 and later versions, so only use this method on legacy systems like Windows Server 2016 or earlier.
- Be cautious of security vulnerabilities when enabling RemoteFX.
- Administrative privileges are needed to enable RemoteFX in Group Policy and launch the necessary services.
Step-by-Step Instructions:
- In Group Policy, enable RemoteFX:
- Navigate to: Computer Configuration > Administrative Templates > Windows Components > Remote Desktop Services > Remote Desktop Session Host > Remote Session Environment.
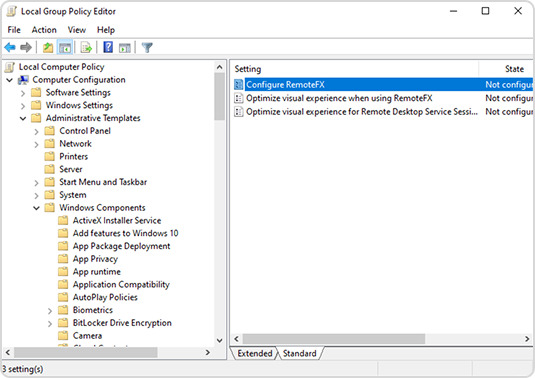
- Enable "Configure RemoteFX"
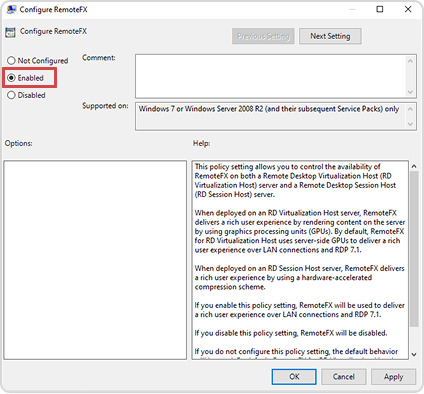
- Restart the system to apply the changes.
- In the RDP client, ensure that audio redirection is enabled under the "Local Resources" tab.
Pros:
- It offers improved performance and compatibility
- It’s also ideal for legacy systems that need enhanced audio redirection
Cons:
- It’s not supported on all Windows versions
- It also requires administrative privileges to enable configurations
NOTE
Issues with microphone in RDP sessions are common and can stem from unsupported hardware, misconfigurations, or network limitations. These problems can cause poor communication, delays, and frustration for you and other remote users. For a detailed instructions on fixing microphone problems in RDP, including common errors and solutions, check out our Microphone Issues in RDP troubleshooting guide.
USB Microphone Redirection via USB Network Gate
USB Network Gate is a software that redirects USB devices in Remote Desktop, including microphones, over the network. This method is ideal for:
- Need advanced microphone functionality in RDP
- Face limitations with native audio redirection methods
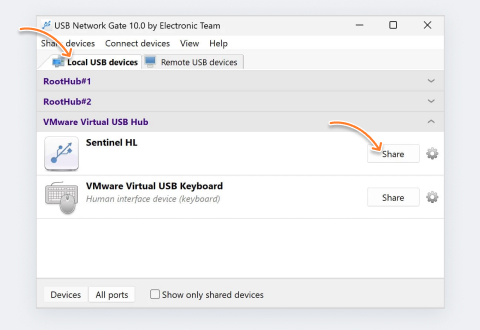
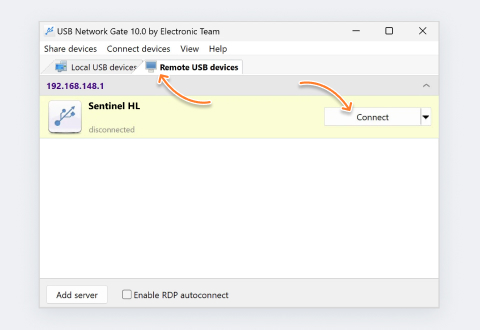
Enable a Microphone in an RDP Session via USB Network Gate:
Download
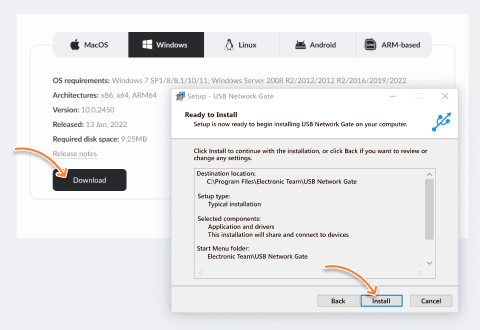
Share
Connect

Benefits of Using UNG for RDP Microphone Passthrough
USB Network Gate offers several key benefits for sharing microphones in RDP sessions. Some of these include:
Supports virtually any USB microphone
USB Network Gate allows RDP access to USB microphones and other devices without any complex configuration, making it an easy-to-use solution for seamless device redirection.
Multiple-platform support
USB Network Gate is a flexible tool that allows cross-platform device sharing between Mac, Windows, and Linux systems. Any platform can act as a server or client, making it ideal for mixed environments.
Secure data transmission
USB Network Gate uses advanced encryption to ensure your data remains secure.
Conclusion
Choosing the right method for RDP microphone redirection depends on your specific requirements. Built-in RDP settings are great for quick and easy setups, while Group Policy and Registry edits offer more control. If you or your team need advanced functionality, tools like USB Network Gate provide seamless USB microphone redirection with added security and cross-platform support.
With this guide, you can choose the best method for RDP microphone redirection, ensuring smooth audio performance for remote work, conferencing, or professional IT management. Whether you need a quick fix, granular control, or advanced USB redirection, these solutions will help you achieve a seamless and efficient remote desktop experience.