Electronic Team uses cookies to personalize your experience on our website. By continuing to use this site, you agree to our cookie policy. Click here to learn more.

Webcam Over RDP Issue and 3 Ways to Solve It

Editorial Team Editorial Team Sep 3, 2023

Remote Desktop Connection became one of the most essential tools when working from home, but it can be difficult for users to access a webcam over a remote desktop session, making it impossible to join video meetings with colleagues.

Are you looking for a straightforward way to connect a webcam to a remote desktop session without having to deal with complex settings? We have the perfect solution for you. Our simple software can help you achieve this effortlessly. Ready to give it a try? Start using USB Network Gate now.

Contents

  1. Native method to work with webcam over RDP
  2. GPO webcam settings to work in RDP
  3. The software method to get access to webcam in Remote Desktop Session
    3.1 How-to instruction for USB webcam passthrough in RDP

Native Method to Allow USB Webcam Passthrough to an RDP session

You may have options when joining a video call. It’s possible to connect using the host machine or from within an RDP session. There are advantages to both methods in certain situations. We are going to demonstrate how to enable USB passthrough so you can use a local webcam in an RDP session.
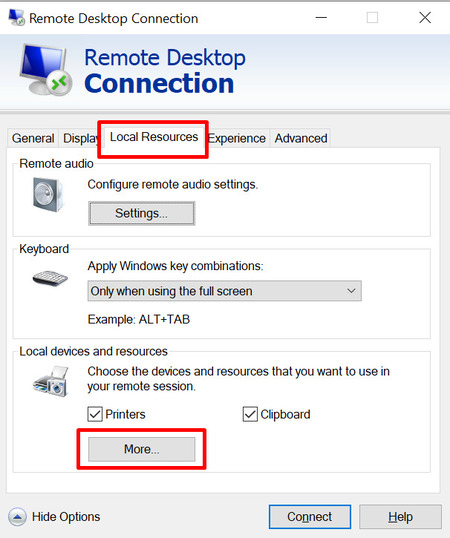
local resources rdp

You need to have a webcam available. It can be connected via USB or be a built-in model on a laptop or monitor. Open the Remote Desktop Connection by running mstsc.exe. Navigate to the “Local Resources” tab, expand the section, and click “More…” under Local devices and resources.
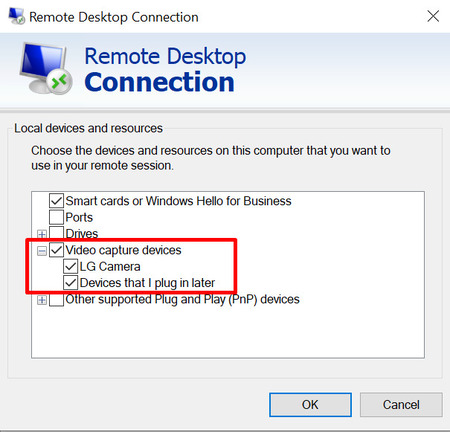
use webcam over remote desktop

Under “Video capture devices” you should find your USB webcam. Check the box to enable the device and save the session.

After connecting, you will be able to access the webcam with remote desktop to join meetings or conferences from an RDP session.

Group Policy Objects Settings that impact webcam access in RDP

Improper GPO (Group Policy Objects) settings are one of the most likely reasons for problems when accessing a webcam over an RDP connection. When you are using a webcam in a remote desktop session, the GPO settings in two locations can alter its behavior. Settings are set on the local remote desktop workstation and the domain server. Effectively using a USB webcam in an RDP session can be impacted by disabling the video, webcam, and other connectivity settings on either machine.

The specific GPO webcam settings that affect connectivity and functionality are located at Computer Configuration > Policies > Administrative, Templates > Windows Components > Remote Desktop Services > Remote Desktop, and Session Host > Device and Resource Redirection. These settings can be accessed and modified as local GPOs that impact a designated workstation or server. They are also available as Active Directory (AD) GPOs that, when modified, affect all machines in a domain.

System administrators must understand the ramifications of making changes to the GPO webcam settings on remote workstations or servers when attempting to resolve a problem. Making temporary changes can cause issues with webcam functionality and connectivity and should be rolled back as soon as possible. If the changes must be retained to resolve the problem, an alternate strategy is to provide a new remote desktop that implements the modifications. The original workstation can then be reconfigured with the necessary domain and local GPO settings to enable efficient webcam connectivity.

local webcam over RDP

Use local webcam over RDP without complex system settings

How to use a local webcam on a remote desktop without needing any additional configuration changes?

USB for Remote Desktop
14-day free trial

With USB Network Gate, you can easily connect a webcam to a remote desktop session. It accomplishes this by virtualizing physical devices and making them available through your machine’s USB ports over an RDP connection. USB Network Gate redirects a virtual copy of the webcam to the remote session, providing a reliable means of transmitting video data. The software lets you engage in quality video conferencing with low latency from an RDP session.

How to use webcam over RDP

Use the following simple steps to use your webcam through a remote desktop session.
1
Download and install USB Network Gate on the computer with the physical connection to the webcam you want to access. We will refer to this machine as the server in this connection. The computer that will use the webcam over RDP is called the client. USB Network Gate needs to be installed on this remote machine as well to enable the connection to be established.
 Download and install USB Network Gate
2
Launch USB Network Gate on the server and a client machine.
3
Select the required USB webcam on the server by opening the “Local USB devices” tab in USB Network Gate and choosing “Share”.
 Select the required USB webcam on the server
4
To finalize the connection, go to USB Network Gate’s “Remote devices” tab and click the “Connect” button.
 finalize the connection

Once the connection is fully established, the remote desktop’s Device Manager will recognize the webcam and give the user the same control as that enjoyed by physically connecting to the peripheral.

Use webcam over remote desktop
14-day free trial

FAQ

If RDP webcam passthrough is not working in a Zoom session, you can resolve the issue with a few easy steps.

  1. Open the Windows Start menu.
  2. Click Hardware Settings and then the Audio/Visual dropdown.
  3. Scroll down and toggle the Camera Privacy Mode to the off position.

For macOS users, look in System Preferences as shown in the following screenshot.

System Preferences
The issue may have been that you need to allow access to the Zoom Remote Desktop camera. Just enable it and you’ll be able to use the camera in your RDP session.
You can access your microphone in Remote Desktop if you are already using a local webcam through an RDP session by changing a simple default configuration parameter. Navigate to Local Resources > Config remote audio settings. Click on Settings and check the remote auto setting to “Record from this computer” rather than using the default option which is “Do not record”. Now the camera works in your Remote Desktop session as well as the microphone.
logo USB Network Gate
#1 at Networking
USB Network Gate
Share USB over Ethernet on Windows
4.7 rank based on 372 + users