Electronic Team uses cookies to personalize your experience on our website. By continuing to use this site, you agree to our cookie policy. Click here to learn more.

Remote 3D Printer Control: Access and Manage Your Printer Over a Network

Editorial Team Editorial Team Jul 28, 2026

3D printers now influence designers to create prototypes and how companies make products. Still, many printers rely on a direct USB connection to a computer, which only works well when the user is nearby. That setup becomes a problem once teams need flexibility.

For companies managing print farms, product development labs, or teams working across different locations, that limitation can slow down daily operations. Failed prints may not be noticed right away, and new print jobs cannot be started remotely. What's more, production often depends on someone being physically present to monitor the machines.

We'll explore the most practical methods for remote 3D printer control, including how each option works and where it fits best. How you can set everything up properly will also be discussed.

Native Option: Built-in Wi-Fi and Ethernet

Some 3D printers — mostly higher-end models from brands like Bambu Lab, Prusa Research, and UltiMaker — already have Wi-Fi or Ethernet connectivity. They have their own remote management apps as well. This option is the only one that doesn't need extra software or hardware.

The printer connects straight to your local network. Once it’s on the network, you can check print progress and control it using the brand’s app on your computer or phone. Some models also have a basic web page you can open in your browser, as long as you’re connected to the same network.

icon pros

Pros:

  • Easy to start using with minimal setup on supported printers;
  • No need for third-party platforms or external devices;
  • Built-in alerts, status updates, and monitoring tools;

icon cons

Cons:

  • Only available on a limited number of premium printers, while most USB-based machines do not support it;
  • Restricted to the manufacturer’s software ecosystem, which limits integration with slicers like Ultimaker Cura or PrusaSlicer;
  • Not ideal for print farms using multiple printer brands;
  • Internet-based remote access 3D printer features usually depend on the manufacturer’s cloud service;

Note: When a printer already has built-in wireless networking and only simple monitoring is needed for a single machine, that’s the easiest option. For larger setups, slicer integration, or printers that only support USB connections, dedicated 3D printer remote access software is the better choice.

Software Solutions for Remote 3D Printer Access

If your printer uses a USB connection, or if basic monitoring is not enough for what you need, software tools are usually the better choice. These solutions range from local network platforms for businesses to open-source setups commonly used by hobbyists.

USB Network Gate — Best for LAN and Ethernet Networks

Suitable for: print farms, engineering departments, multi-printer workspaces, and virtual desktop environments running over a local network.

USB Network Gate provides remote 3D printer control by sharing a printer’s USB connection over a LAN or Ethernet network at the driver level. Once connected, the remote computer detects the printer as though it were plugged in directly through USB. With that, users can manage prints and adjust settings. They can also send jobs normally through their preferred slicer software. USB Network Gate is a universal solution for sharing USB devices over a network.

icon pros

Pros:

  • Driver-level sharing makes the printer appear as a locally connected USB device;
  • Supports nearly any USB-based 3D printer without firmware modifications;
  • Compatible with popular slicers such as Ultimaker Cura, PrusaSlicer, and Bambu Studio;
  • Works across Windows, macOS, and Linux systems;
  • Allows several printers to run from one host machine;
  • Functions inside RDP, VMware, Hyper-V, and Citrix environments;
  • Keeps data within your internal network instead of routing through the cloud;
  • Includes SSL encryption and password protection for added security;

icon cons

Cons:

  • Built mainly for LAN and Ethernet setups, so internet-based remote access 3D printer connections may require a VPN

How to set it up

1
Install
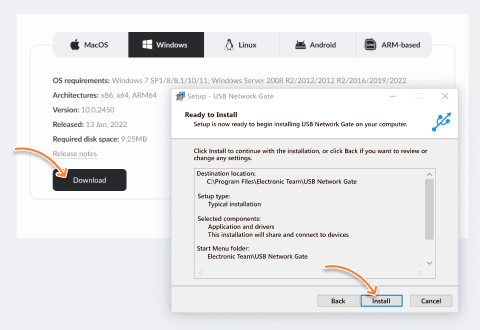
Request free trial and install the software on the host computer — Download and install USB Network Gate on the machine physically connected to the printer. Versions are available for Windows, macOS, and Linux.
Request free trial and install the software on the host computer
2
Share
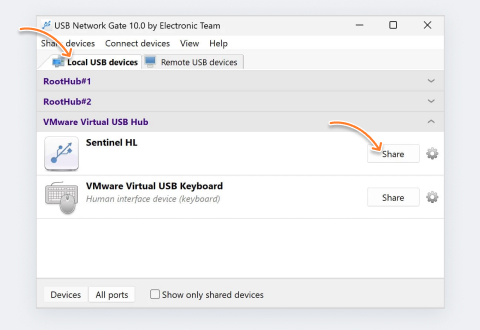
Share the printer’s USB connection — Launch the application, locate the printer in the device list, and select Share. You can also enable SSL encryption and add a password if needed.
Share the printer’s USB connection
3
Connect
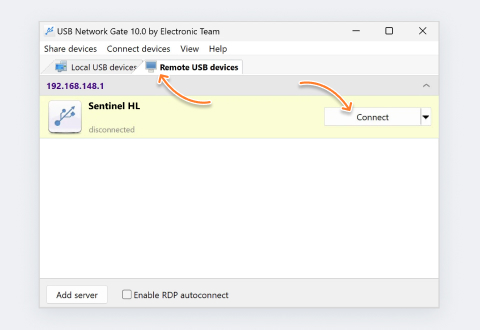
Connect from another computer — Install the software on the remote machine. In the Remote Devices section, enter the IP address of the host computer. Once the printer appears in the list, click Connect to access it remotely.

Start printing normally — Open your slicer software, such as Cura or PrusaSlicer. The printer will appear as if it were directly attached to the computer, allowing full control of the 3D printer during printing and setup.
Connect from another computer

The whole setup usually only takes a few minutes. You don’t need to know Linux well or have any Raspberry Pi hardware. There’s no complicated setup to go through anymore. Just install it on your main computer, share the USB port, and then you can connect to it from any device on the same network.

FlexiHub — Best for Internet Access across Locations

Suitable for: distributed teams, remote operators, and accessing printers over the internet without setting up a VPN.

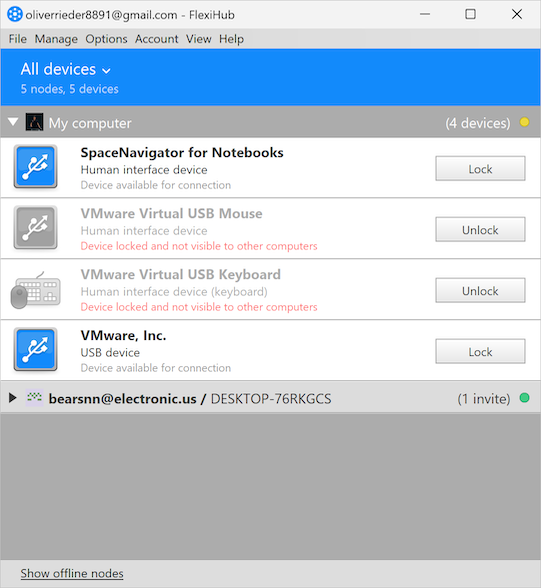
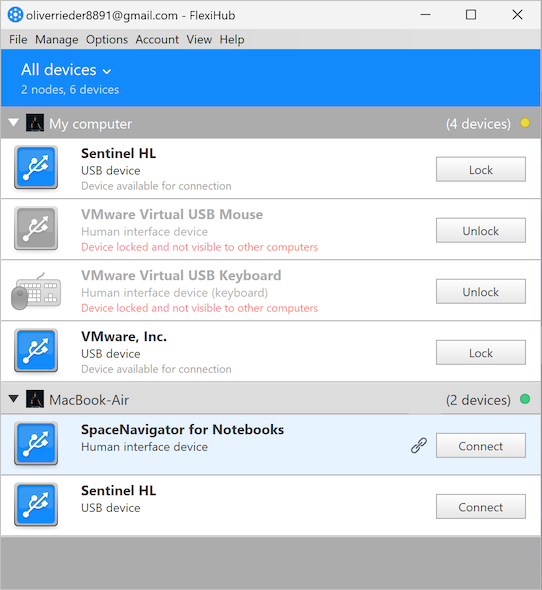
FlexiHub is a USB-over-network tool that operates at the driver level, so a shared 3D printer can be used as if it were connected directly to your computer. It is meant for internet-based access, using the app's cloud relay system so you can reach devices across different networks without manual network configuration. This makes it a practical option for remote 3D printer control across different locations.

icon pros

Pros:

  • Works over the internet immediately, without requiring VPN setup or port forwarding configuration;
  • Provides driver-level access with full slicer compatibility, making the printer appear as a locally connected USB device;
  • Supports Windows, macOS, Linux and Android systems;
  • Uses SSL encryption to secure all connections and data transfer;
  • Offers an account-based system to simplify the management of shared devices;

icon cons

Cons:

  • Pricing based on a subscription model;
  • Data is routed through FlexiHub relay servers, which may not suit strict on-premise environments;

How to Set it Up

1
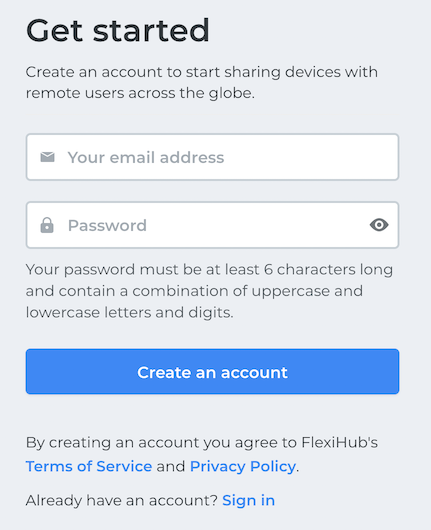
Create an account — Sign up on FlexiHub and install the software on both the host computer (connected to the printer) and the remote machine.
 install usb network gate
2
Share the printer — On the host device, open the application and share the USB port connected to your 3D printer. The printer will appear in your account as a shared device.
 Select USB device
3
Connect remotely — Log in from any computer with internet access. From the device list, choose the shared printer and connect to it. Once connected, it appears on the system as a USB device that’s plugged in directly.
 Select USB device
4
Start printing — Open your slicer software and select the printer as usual. No extra setup is needed to begin printing.

The setup is simple enough. There’s no need to set up a VPN, configure port forwarding, or use Linux-based systems. You just create an account and install the software. From there, the device can be shared and used from anywhere with internet access.

OctoPrint — Best for Hobbyists and DIY Setups

Suitable for: solo makers, hobbyists, and single-printer setups that can handle some technical setup.

OctoPrint is a free, open-source 3D printer remote access software that has a web-based interface. It runs on a Raspberry Pi connected to your printer and provides a browser-based dashboard. You can monitor prints, as well as control the machine, on this dashboard. Managing jobs from any device on the same network is also possible. You can also access the printer remotely over the internet using port forwarding or proper network configuration.

icon pros

Pros:

  • Free and open source;
  • Wide range of available plugins, like timelapse capture, bed leveling tools, firmware updates, and more;
  • Strong community support and detailed documentation;
  • Built-in webcam monitoring for live print viewing;
  • Works on local networks and can be used over the internet with port forwarding or VPN setup;

icon cons

Cons:

  • Needs a Raspberry Pi and a Linux-based setup, which may be difficult for non-technical users;
  • Runs through a web interface rather than driver-level access, so some slicers cannot directly transfer print files to the printer;
  • Typically supports one printer per Raspberry Pi, which makes it harder to use when you have many printers;
  • Needs ongoing maintenance, including updates, plugin management, and occasional troubleshooting;

AstroPrint and 3DPrinterOS — Best for Simple Cloud Monitoring

Suitable for: schools, universities, and small labs that only need basic browser-based monitoring that doesn’t need setting up local systems.

AstroPrint and 3DPrinterOS are cloud platforms that provide remote access to a 3D printer from a web browser over the internet. You can upload files and track how each print is doing using them. Managing multiple printers from one dashboard can also be done. Each printer needs a connected device like a Raspberry Pi or vendor-specific hardware, and all remote 3D printer control and data go through their cloud systems.

icon pros

Pros:

  • No local server setup needed — everything runs in the browser;
  • Accessible from any device with an internet connection;
  • Supports multiple users with controlled access rights;
  • Works well for schools and training environments with limited IT support;

icon cons

Cons:

  • External cloud servers handle the data, which may not suit sensitive or private production work;
  • You pay subscription costs per printer, and the total increases as you add more devices;
  • The system offers limited slicer integration, since it relies on built-in tools instead of your usual workflow;
  • Depends on an internet connection and platform availability to work properly;

Which Method Should You Choose?

The best tool for remote access to a 3D printer depends on your setup and how many printers you’re running. How much oversight you want during operation needs to be considered, too. Here’s a simple reference to help you decide:


Method Best network Best suited for Key point
USB Network Gate LAN / Ethernet Print farms, engineering labs, VM/RDP environments Driver-level control on local network; internet needs VPN
FlexiHub Internet (any network) Remote teams, distributed access across locations Internet-ready out of the box; data routes via cloud relay
OctoPrint LAN (+ port forwarding) Hobbyists, DIY makers, single-printer setups Free, powerful, but requires RPi and technical setup
AstroPrint / 3DPrinterOS Cloud Schools, labs needing simple browser monitoring Easy to start, but data leaves your network
Built-in Wi-Fi LAN / cloud (brand) Single-printer home or studio use Zero setup — only on supported premium models

For most business setups — print farms, engineering labs, or any group looking for stable slicer-level access to USB printers over a local network — USB Network Gate is the perfect solution.

For teams that need internet-based access without setting up a VPN, FlexiHub uses a similar driver-level method that can connect devices on different networks.

OctoPrint is still the strongest free option for solo makers who prefer setting up a Raspberry Pi.

Cloud platforms can work well as a simple starting point for schools and institutions that want things that are easy to use, instead of having more control options.

Frequently Asked Questions

Yes. USB Network Gate allows you to share a printer’s USB connection over your local network, working directly at the driver level. That means you don’t need a Raspberry Pi, Linux setup, or any web interface.On the remote computer, the printer shows up as if it’s physically plugged in. Slicing software works normally, just like it would on a directly connected machine, because of that.

Connect the printer by USB to a host computer that is on the same local network. Install USB Network Gate on that host and share the USB port. Install the client on the remote computer after that and connect to it. The printer becomes available over Ethernet like a directly attached device, without extra adapters or converters.

Yes — any USB-connected 3D printer is supported. You don’t need model-specific drivers or firmware changes. Checking if it's compatible is also unnecessary. This includes printers from Creality (Ender, CR series), Prusa (MK3, MK4, Mini), Bambu Lab (X1, P1), Anycubic, Flashforge, and others.

You can share several USB printers from one computer, as long as there are enough USB ports for them. In setups with multiple users, each printer can be linked to a specific person so things don’t get mixed up. This is especially useful in print farms or shared computers used for remote 3D printer control.

Yes. USB Network Gate can send printers into RDP sessions, VMware, Hyper-V, and Citrix environments. Inside the session, the printer shows up as a device attached to the computer. Standard RDP does not handle USB devices well on its own, so this is useful for teams working in virtual desktop setups.

USB Network Gate
Redirect USB devices over network
Free Version available
License prices start at $0
Available for