How to Share USB Printer over Network
Printers are far from obsolete, despite the world’s emphasis on paperless, electronic communication. Organizations and individuals often need to share a printer to optimize peripheral device usage and reduce costs. Printer sharing in an office or household is a convenient way for multiple users to create printed documents. However, it can be challenging to share a printer over a network.
Standard printers are not designed for sharing over a network and typically offer limited connectivity to a single computer. Most users don’t want to invest in an expensive network-ready printer and opt for a solution that enables multiple devices to access a centralized printer. The expansion of the mobile workforce has made sharing a printer on a network essential, allowing users to print from any remote location.
This guide shows you how to share a printer over a LAN on Windows 10 and Windows 11 systems. We also discuss how to share a USB printer over the Internet with advanced solutions such as USB Network Gate.
Prerequisites for Network Printer Sharing
You must have these prerequisites in place before sharing a network printer.
• The printer must have a USB or network connection to a host machine (via USB or network).
• All required drivers have been installed on the host machine.
• Devices requiring access to the printer are on the same network or are using remote access tools.
• You have admin privileges on all involved devices.
Native OS Solutions for LAN-Based Printer Sharing
Many home and small office environments opt for native OS solutions to share a printer in Windows 10 and Windows 11. These techniques work well in most situations and don’t require any third-party software. However, they have limitations that may make them inadequate for advanced use cases.
Let’s examine the standard native LAN-based solutions to see their strengths and weaknesses, and any OS specific information necessary to establish effective printer sharing.
Using Windows Settings to Share a Local Printer
The simplest method for sharing a network printer between devices over a LAN is through the Windows Settings app.
Using Control Panel for Network Printer Sharing
The Control Panel provides more advanced options and control for printer sharing in Windows 10 and 11. Users can set permissions and firewall rules using this technique.
Sharing a Printer Using Control Panel
OS notes: Windows 10 and Windows 11 use the same method for sharing printers through Control Panel, but Windows 11 may hide the Control Panel.
- Open Control Panel: Go to Control Panel > Network and Sharing Center.
- In the left panel, click Change advanced sharing settings. Enable Network discovery and File and printer sharing.
- Go to Devices and Printers → right-click your selected printer → Printer Properties → Sharing tab.
- Select “Share this printer” and enter a name for the device to facilitate easier sharing.
Pros:
- More suitable for complex office or home networks
- Enables granular control over permissions and security settings
Cons:
- More complicated than using the Settings app
- Less intuitive than some other methods
Direct IP Printing
Direct IP Printing eliminates the requirement for a host PC. Users directly connect to the printer’s IP address over the network. This technique works best with printers that have a built-in network interface.
How to Share a Printer Using the Direct IP method on Windows 10 and 11
Windows 10 and 11 support this method; however, you may need to manually install the printer drivers if they are not automatically detected.
- Find the Printer’s IP by checking the printer’s settings menu or the router to obtain the printer’s IP address.
- On your Windows device, go to Settings > Printers & Scanners.
- Click Add a printer → The printer I want isn’t listed → Add via IP.
- Select Standard TCP/IP Port and enter the printer’s IP address. Follow the prompts to complete printer installation.
Pros:
- No host PC needed, devices connect directly to the printer with no host computer
- Best for printers with a static IP address
Cons:
- Requires the printer to have an IP address or an Ethernet/Wi-Fi connection
- Manual configuration is required for the IP address
Print Management Console
The Print Management Console is a Microsoft Management Console (MMC) snap-in that enables users to manage multiple printers. The MMC is an effective solution for organizations with numerous network printers or that need advanced configuration functionality.
How to Share a Printer with the Print Management Console
OS Notes: The MMC is only available in Windows 10 and 11 Pro and Enterprise editions and is not supported in the Windows Home version.
- Press Win+R, type printmanagement.msc, and press Enter to open the Print Management Console.
- In the MMC, expand Print Servers → your PC name → Printers.
- Right-click the printer you want to share → Properties → Sharing tab → check Share this printer.
- Name the shared printer and configure permissions if necessary.
Pros:
- Centralizes printer management
- Streamlines remote management of multiple printers
Cons:
- Limited to the Windows 10/11 Pro and Enterprise editions
- Less intuitive method for general users
PowerShell Print-Cmdlets
PowerShell print cmdlets enable users to write scripts that automate printer setup and sharing. System administrators may find this a valuable method for managing shared printers in complex environments and performing bulk printer installations.
How to Share a Printer Using PowerShell
OS Notes: Requires PowerShell 5.0 or later on Windows 10 and Windows 11.
- Open PowerShell as Administrator.
- Use this command to create a shared printer:
Add-Printer -Name "OfficePrinter" -DriverName "HP Universal" -PortName "IP_192.168.1.50" - Enable sharing with this command:
Set-Printer -Name "OfficePrinter" -Shared $true -ShareName "OfficePrinterShare"
Pros:
- Supports automation and remote management
- Provides granular printer control and supports advanced configuration
Cons:
- Requires PowerShell and scripting knowledge
- Overly technical for inexperienced users
Share a Printer Using USB Network Gate
Native methods for printer sharing may be insufficient when faced with issues such as USB-only printers, multiple subnets, or remote access requirements. USB Network Gate is an effective solution that enables you to share a printer over an IP-based network, like a VPN, LAN, or the Internet.
USB Network Gate is a software utility that lets you share USB devices by redirecting the device’s connection. Shared printers appear as if locally connected and provide complete functionality to remote client machines.
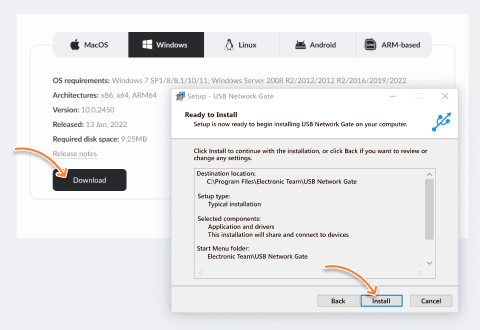
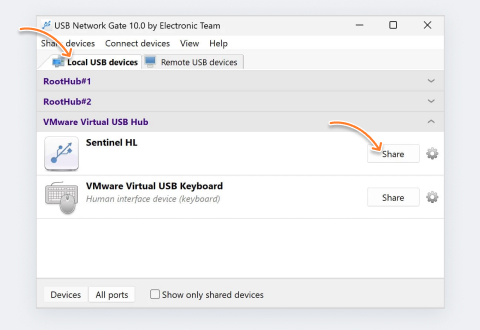
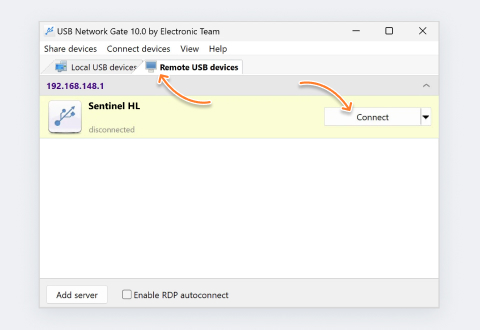
How to Share a USB Printer Using USB Network Gate
1. Install

2. Share

3. Connect


Pros:
- USB printers can be shared across networks, subnets, or remote locations
- Works with any USB printer and other USB devices
- Supports cross‑platform sharing on Windows, macOS, and Linux systems
Cons:
- It is not a free solution, but it is cost-effective
The native printer-sharing methods in Windows 10 and 11 discussed above are sufficient for many small office and home use cases. These techniques may be inadequate for more complex situations. USB Network Gate can be an effective way to share a printer over a network on Windows 10 and 11 in the following scenarios.
Remote Office Printing
Problem: Printers must be shared across multiple locations, including remote offices and different networks.
Solution: USB Network Gate enables remote users to access a USB printer over a VPN or the Internet. This solution bypasses the local network, offering efficient connectivity for physically distant printers.
Cross-OS Compatibility
Problem: Sharing a USB printer between Windows, macOS, and Linux systems.
Solution: USB Network Gate enables you to establish printer sharing between Windows 11 and Linux systems, as well as between any combination of Windows, macOS, and Linux machines. No additional drives are needed to facilitate printer sharing.
Virtual Machines (VMs)
Problem: Sharing a USB printer with virtual machines on platforms such as VMware or Hyper-V.
Solution: USB Network Gate enables VM guests to share a printer attached to the host machine, providing the same functionality as a direct physical connection.
No Native Drivers
Problem: Some printers may not have drivers to support specific operating systems.
Solution: USB Network Gate eliminates the need for OS drivers by establishing a virtual USB connection between the printer and computer. The solution supports the use of printers on any network-connected system.
RDP/Thin Clients
Problem: Terminal servers or remote desktop sessions (RDP) where users require access to a local USB printer.
Solution: Local USB printers may not be detected by the server in thin client environments. USB Network Gate redirects the connection, allowing users to access local USB printers from an RDP or thin client desktop session.
Final Thoughts
Printer sharing over a LAN in Windows 10 and 11 is an efficient way of providing users with easy access and maximizing the value of the peripheral device. Based on your needs and configuration, you can use native methods or advanced solutions, such as USB Network Gate. The proper technique allows you to share a printer across all your devices.