Electronic Team uses cookies to personalize your experience on our website. By continuing to use this site, you agree to our cookie policy. Click here to learn more.

How to Connect USB 3D Printer to Ethernet

Editorial Team Editorial Team Jul 28, 2026

A common problem users face when attempting to share a USB 3D printer over a network is connecting the device to an Ethernet port. While this seems like it should simply require plugging the printer into a USB-to-Ethernet adapter, this strategy often fails.

Connecting pc to Ender 3 via usb to Ethernet adapter, will this work?


3D printers require continuous data streaming and stable serial connectivity. The printers are more sensitive to connection issues, interruptions, and latency than standard USB devices. These issues often affect long print jobs that can take hours to complete.

An intermediate solution is required to enable remote access to a 3D printer over a LAN by bridging USB communication to the network, rather than using a direct connection.

This guide examines all effective methods for connecting a 3D USB printer to an Ethernet network. We look at hardware and flexible software solutions such as USB Network Gate.

You must meet the following prerequisites to set up remote access to a 3D printer over a LAN.

  • The printer must be connected via USB to a host computer.
  • The host device must be connected to the Ethernet (LAN).
  • All required drivers must be installed and functioning properly.
  • The target devices must be connected to the same LAN.
  • You require administrative rights and permissions on all systems.

Hardware Methods to Establish a 3D Printer Ethernet Connection

The following hardware-based approaches may be useful, but provide limited functionality, are expensive, and can depend on specific device compatibility to support 3D printing workflows.

Hardware USB Device Server

A USB device server connects a USB 3D printer and makes it available over Ethernet. Unfortunately, some device servers cannot provide the reliability required to support the continuous data streams of 3D printers.

icon pros Pros:

  • Provides a stable, hardware-based connection solution
  • Eliminates the need for a constantly running PC

icon cons Cons:

  • Manual configuration is required
  • Can be expensive versus software solutions
  • Not generally suitable for home or small office deployment

USB-to-Ethernet Adapter

You can try connecting a USB 3D printer directly to Ethernet using a USB-to-Ethernet adapter. This technique may work if the printer’s firmware provides compatible drivers and supports USB networking.

When successful, the adapter serves as a network interface with an IP address, allowing you to connect a 3D USB printer over IP.

Note: This method does not work with most 3D printers, including the Prusa Mini, Ender-3, and Anycubic models.

icon pros Pros:

  • Offers an inexpensive solution with proper hardware support
  • It is a simple solution with no manual configuration
  • No additional hardware or computers are required

icon cons Cons:

  • It is not universally supported
  • The solution often delivers unreliable performance
  • It depends on the chipset and firmware compatibility

Why Hardware Methods Often Fail

Hardware solutions are generally straightforward, but typically offer limited functionality with 3D USB printers. These limitations make hardware solutions less effective than software-based techniques for connecting a USB 3D printer to an Ethernet network.

A USB 3D printer to Ethernet adapter may not work for these reasons:

  • You have a protocol mismatch between USB and Ethernet. Adapters may need a bridging solution to translate USB data for transmission over a network.
  • Most 3D printers lack the driver and firmware support necessary to detect a network connection using a USB adapter.
  • Some adapters and device servers cannot reliably support long printing sessions. Hardware-based solutions are inflexible and are difficult to integrate with complex or virtual environments.

Software and Bridge Solutions for Connecting a 3D Printer to Ethernet

Software or other intermediary components provide a more reliable way to connect a 3D printer to an Ethernet network. They are a bridge allowing communication between a USB device and the network.

USB Network Gate

USB Network Gate is a free software application that allows users to easily connect a USB 3D printer to an Ethernet network. The tool redirects USB data over a local network. It provides the stability teams need for 3D printing environments over LANs or virtualized infrastructure.

icon pros Pros:

  • Supports most USB 3D printers if the necessary drivers are installed on the client machine
  • Cross-platform support for Windows, Linux, and macOS
  • Enables remote access to USB devices over LAN
  • Encrypts network data transmission for enhanced security
  • Supports virtual environments such as VirtualBox, VMware, and Hyper-V
  • Requires no firmware modification

icon cons Cons:

  • Commercial use requires a paid license

How to connect a USB 3D printer with USB Network Gate

1
Step 1:
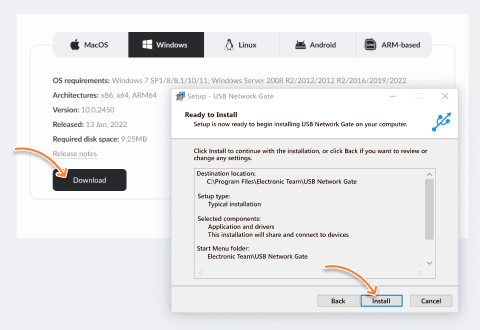
Install USB Network Gate on the host machine connected to the printer and on the remote client.
Request free trial and install the software on the host computer
2
Step 2:
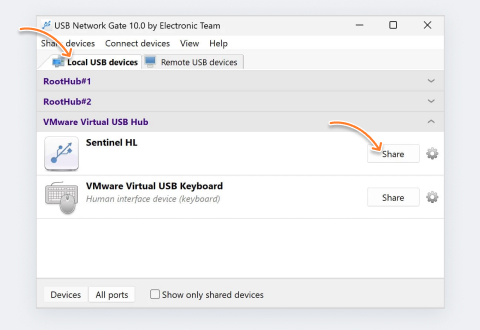
Share the printer by opening the app on the Host, locating the 3D printer in the local USB device list, and clicking ‘Share’ next to its name.
Share the printer’s USB connection
3
Step 3:
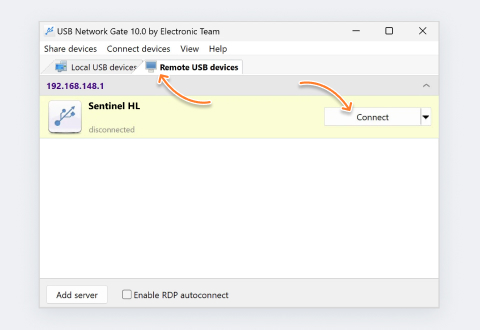
Open USB Network Gate on the client and navigate to the Remote Devices tab. Click ‘Connect’ next to the shared printer.
Connect from another computer

Using a Host PC

You can use a computer as an intermediary between the printer and the network. You connect the USB printer to the computer, and the computer makes it available over the network with third-party software or OS tools. This basic method may lack reliability for long printing jobs.

icon pros Pros:

  • Compatibility with all USB 3D printers
  • No additional hardware requirements

icon cons Cons:

  • The host computer must run continuously
  • Provides limited scaling and sharing capability

Connecting USB 3D Printer with OctoPrint and a Raspberry Pi

OctoPrint lets you use a Raspberry Pi as a dedicated print server. You connect the printer to the Pi with USB, and the Pi provides Ethernet network connectivity. It’s a free option that delivers browser-based access from devices on the same network. It is a popular solution but has a steep learning curve and some limitations that must be considered.

icon pros Pros:

  • Enables remote monitoring with a browser
  • Free and open-source with many plugins
  • Works with Fused Deposition Modeling (FDM) printers

icon cons Cons:

  • Requires the additional cost of purchasing a Raspberry Pi
  • Complex and time-consuming installation and configuration
  • Limited cross-platform compatibility
  • No full USB passthrough functionality
  • Not appropriate for enterprise or virtual environments
  • Supporting multiple printers is expensive

How to Set Up OctoPrint for Ethernet Access

1
Flash OctoPrint: Open Raspberry Pi Imager → Other specific-purpose OS → 3D printing → OctoPi. Configure hostname and SSH in settings, then write to microSD.
2
Connect hardware: Insert the SD card into the Pi → connect printer via USB → connect Pi to router via Ethernet → power on.
3
Access and configure: Open http://octopi.local in a browser. Complete the setup wizard, choose a printer profile, and set the correct baud rate for your modem.
4
Start printing: Upload G-code files through the browser interface to begin remote printing.

Note: OctoPrint does not create a true USB connection. It provides a monitoring and control interface that must be augmented with plugins or manual configuration for tasks requiring direct USB access. USB Network Gate delivers full USB passthrough across a network.

Conclusion

The best way to connect a USB 3D printer to Ethernet depends on your technical skills, the environment, and how you will use the device. 3D printers require stability, as any connection disruption can lead to failed jobs and wasted resources.

  • USB Network Gate is the optimal choice for stable, scalable environments.
  • A host PC is the best option for simple setups.
  • OctoPrint offers good remote control and monitoring functionality.

Simple adapters do not provide a reliable way of connecting a USB 3D printer directly to an Ethernet network. A hardware or software bridge delivers the continuous communication necessary for the efficient operation of 3D printers.

FAQ

Yes, they do. All devices must be on the same LAN. USB Network Gate supports a LAN by default, so it is not reliant on internet access.

An adapter typically does not work with low-cost FDM printers such as the Anycubic Kobra or Ender-3. The firmware and chipsets for these printers do not support Ethernet through a USB adapter. Reliable options include USB Network Gate or a dedicated print server.

Yes. USB Network Gate is compatible with virtualization platforms such as VirtualBox, VMware, and Hyper-V. Its reliability makes it an excellent solution for development environments. You can try FlexiHub; it connects to your 3D printer wherever you are.

Yes. USB Network Gate creates a true virtual USB connection. This connection lets users interact with the remote printer as if it were directly attached to their computer. Users can perform tasks such as firmware updates, which are impossible with monitoring solutions like OctoPrint.

USB Network Gate
Redirect USB devices over network
Free Version available
License prices start at $0
Available for